Arduino Nano 33 IoT
The Arduino Nano33 IoT is a very small ARM development board based on the Atmel SAMD21 family of processors. It also has a NINA-W102 chip onboard which provides an wireless communication abilities based on the popular ESP32 family of wireless chips from Espressif.
Peripherals:
- NINA-W102 chip with wifinina firmware (wifi and bluetooth)
- lsm6ds3 IMU chip (acceleration, rotation and temperature)
Interfaces
| Interface | Hardware Supported | TinyGo Support |
|---|---|---|
| GPIO | YES | YES |
| UART | YES | YES |
| SPI | YES | YES |
| I2C | YES | YES |
| ADC | YES | YES |
| PWM | YES | YES |
| USBDevice | YES | YES |
Pins
| Pin | Hardware pin | Alternative names | PWM |
|---|---|---|---|
RX0 |
PB23 |
||
TX1 |
PB22 |
||
D2 |
PB10 |
TCC0 (channel 0) |
|
D3 |
PB11 |
TCC0 (channel 1) |
|
D4 |
PA07 |
TCC1 (channel 1) |
|
D5 |
PA05 |
TCC0 (channel 1) |
|
D6 |
PA04 |
TCC0 (channel 0) |
|
D7 |
PA06 |
TCC1 (channel 0) |
|
D8 |
PA18 |
TCC0 (channel 2) |
|
D9 |
PA20 |
TCC0 (channel 2) |
|
D10 |
PA21 |
TCC0 (channel 3) |
|
D11 |
PA16 |
SPI0_SDO_PIN |
TCC2 (channel 0), TCC0 (channel 2) |
D12 |
PA19 |
SPI0_SDI_PIN |
TCC0 (channel 3) |
D13 |
PA17 |
LED, SPI0_SCK_PIN |
TCC2 (channel 1), TCC0 (channel 3) |
A0 |
PA02 |
||
A1 |
PB02 |
||
A2 |
PA11 |
TCC1 (channel 1), TCC0 (channel 3) |
|
A3 |
PA10 |
I2S_SCK_PIN |
TCC1 (channel 0), TCC0 (channel 2) |
A4 |
PB08 |
SDA_PIN |
|
A5 |
PB09 |
SCL_PIN |
|
A6 |
PA09 |
TCC0 (channel 1), TCC1 (channel 3) |
|
A7 |
PB03 |
||
USBCDC_DM_PIN |
PA24 |
TCC1 (channel 2) |
|
USBCDC_DP_PIN |
PA25 |
TCC1 (channel 3) |
|
UART_TX_PIN |
PA22 |
TCC0 (channel 0) |
|
UART_RX_PIN |
PA23 |
TCC0 (channel 1) |
|
NINA_SDO |
PA12 |
NINA_TX |
TCC2 (channel 0), TCC0 (channel 2) |
NINA_SDI |
PA13 |
NINA_RX |
TCC2 (channel 1), TCC0 (channel 3) |
NINA_CS |
PA14 |
NINA_RTS |
TCC0 (channel 0) |
NINA_SCK |
PA15 |
NINA_CTS |
TCC0 (channel 1) |
NINA_GPIO0 |
PA27 |
||
NINA_RESETN |
PA08 |
I2S_SD_PIN |
TCC0 (channel 0), TCC1 (channel 2) |
NINA_ACK |
PA28 |
Machine Package Docs
Documentation for the machine package for the Arduino Nano33 IoT
Pin Mapping
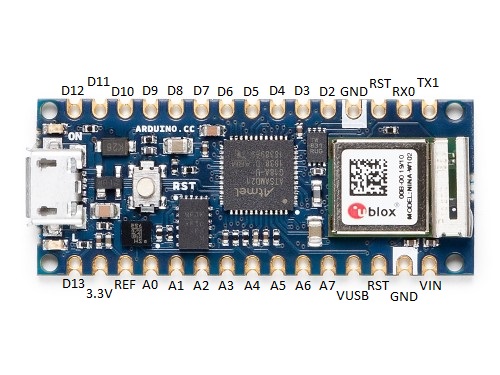
Since the pin labels are located on the other side of the board, here is a picture showing the pin numbering from the front side perspective:
Installing BOSSA
In order to flash your TinyGo programs onto the Arduino Nano33 IoT board, you will need to install the “bossac” command line utility which is part of the BOSSA command line utilities.
macOS
You can use Homebrew to install the BOSSA command line interface by using the following command:
brew install bossa
Or if you prefer, you can also download the installer from https://github.com/shumatech/BOSSA/releases/download/1.9.1/bossa-1.9.1.dmg
Once you have downloaded it, double click on the .dmg file to perform the installation.
Linux
On Linux, install from source:
sudo apt install libreadline-dev libwxgtk3.0-gtk3-dev
git clone https://github.com/shumatech/BOSSA.git
cd BOSSA
make
sudo cp bin/bossac /usr/local/bin
Windows
You can download BOSSA from https://github.com/shumatech/BOSSA/releases/download/1.9.1/bossa-x64-1.9.1.msi
VERY IMPORTANT: During the installation, you must choose to install into c:\Program Files. The installer might have the wrong path, so edit it to match c:\Program Files.
After the installation, you must add BOSSA to your PATH:
set PATH=%PATH%;"c:\Program Files\BOSSA";
Test that you have installed “BOSSA” correctly by running this command:
bossac --help
Flashing
Once you have installed the needed BOSSA command line utility, as in the previous section, you are ready to build and flash code to your Arduino Nano33 IoT board.
CLI Flashing
-
Plug your Arduino Nano33 IoT board into your computer’s USB port.
-
Build and flash your TinyGo code using the
tinygo flashcommand. This command flashes the Arduino Nano33 IoT with the blinky1 example:tinygo flash -target=arduino-nano33 examples/blinky1 -
The Arduino Nano33 IoT board should restart and then begin running your program.
Troubleshooting
If you have troubles getting your Arduino Nano33 IoTboard to receive code, try this:
-
Press the “RESET” button on the board two times to get the Arduino Nano33 IoT board ready to receive code.
-
Now try running the
tinygo flashcommand as above:tinygo flash -target=arduino-nano33 [PATH TO YOUR PROGRAM]
Once you have updated your Arduino Nano33 IoT board the first time, after that you should be able to flash it entirely from the command line.
Notes
You can use the USB port to the Arduino Nano33 IoT as a serial port. UART0 refers to this connection.
For information on how to use the built-in NINA-W102 wireless chip with the default firmware, please see the “wifinina” driver in the TinyGo drivers repository located at https://github.com/tinygo-org/drivers/tree/release/wifinina.
You can also use the Espressif ESP-AT firmware, although you will need to flash it yourself. Please see the “espat” driver in the TinyGo drivers repository located at https://github.com/tinygo-org/drivers/tree/release/espat.